Showing posts with label projects. Show all posts

Saturday, December 15, 2012

DIY PJ Pants


I have been wanting to make the boys some pajama pants for a while out of some tacky kid fabric that I would never pick out myself and let them pick out. However for a fun stocking stuffer I let them pick out some fabric and made pillowcases.
I had a ton of plaid flannel fabric left over from stockings that I made a couple years ago so I opted for that to make the pants with instead of buying more fabric.
I semi-used this tutorial that I found on Pinterest...
pajama-pants-tutorial.jpg

It is a very helpful tutorial but I was in a lazy mood and thought I could figure it out once I got started. I kind of did :) 
I was also too lazy to drive to the store to buy elastic so I made them drawstring.

My intention was for these to be their "Christmas PJ's" instead of paying money for actual Christmas PJ's that they can only wear for a couple weeks because then it's not Christmas any more. I like to think of myself as a reasonable shopper and cute PJ's are way too expensive for something that 95% of the time they are going to wear when they're home and in bed.
When I mentioned to the boys that these are their Christmas PJ's they wanted to know why there are no snowflakes, snowmen or Santa Claus on them...
So depending on how hard they push the issue I may have to go buy some Christmas-y iron on patches to Christmas them up!
While making these I realized I am getting ready to have a girl because it was all I could do not to put ruffles on them somewhere! :)

Monday, July 16, 2012

Fabric Covered Letter

Ok here is the tutorial for the fabulous door hanger...
The H I found is from Hobby Lobby, they have different sizes and styles of letters.
The fantastic fabric was a fat quarter I picked up and stashed for something fun :)
I traced the letter onto the backside of the fabric.
Cut the letter out as close as you can to the line. 
I used some homemade mod podge, brushed the mod podge onto the letter and very carefully place the fabric onto the letter.
Tip 1: You have to rub the fabric for as long as it takes the glue to dry or else it will bubble up at the last second. 
Tip 2: On most mod podge projects, you put the glue down before you put the whatever on and then brush glue on top of whatever you glued down... don't do that with this project, the fabric will peel off the letter VERY easily and is a lot more likely to bubble.
I used a razor blade to cut off any excess fabric that was hanging over.
I used a scrap piece of burlap for the hanger, just hot glued it onto the back of the letter.
Tied the bow with black burlap and hot glued it onto the middle of the 'hanger burlap'

and Taa Daa! I love it!

Thursday, July 12, 2012

New Living Room Art!


Yay! I have had my eye on this project for a long time and finally got to do it! 
The beautiful thing about being a teacher is getting summers off, don't let anyone ever complain about that! Yes we still have to go to staff development and work in our rooms to get ready for the next year but you still have a beautiful amount of time to work on projects, oh yeah, and hang out with your children :)
I saw this on Pinterest, I think I actually think it's one of the first things I ever pinned, aww.
I fell in love with the look and the words, they are actually the lyrics to an Ingrid Michaelson song. (I may or may not have spelled her name wrong, sorry Ingrid)
The link to the original project is here. Me Oh My... It's a super fun blog with lots of cute stuff, I highly recommend browsing through it!

So I had this awkward spot in my living room and wasn't sure what to put there and then it came to me... a big plank of wood with something cute painted on it...
There's my plank of wood... It took forever for me to actually stain it, and of course I took pictures because it was the first thing I ever stained, and I think I did a pretty good job
I don't remember the brand but I do remember the color was ebony. It actually stayed in my living room just stained for a long time, I think it looks pretty :)
But I finally put a good movie on and plopped down in the floor and started painting the words to the fun little song.
Oh yeah and it looks awesome with my new lamps! I love my new lamps, I went to Home Goods for the first time this summer and scored them for an awesome price! 
I am thinking of doing a booth at the First Saturday show at the Chicken Farm Art Center in August, trying to make some extra money and get my 'business' started... I feel like a child with a lemonade stand when I saw my 'business', I have no 'business' I make no money, lol. One day...
Anyways, I really enjoyed making this and thought about doing some smaller ones, that could hang on a wall or sit on a table/dresser with sweet sayings, verses, something...


Saturday, July 7, 2012

Save the Toms!


I have a very obvious love for leopard print and Toms...
and I have a very sad story about my very first pair of leopard Toms that I love the most...
they began to fade, got some stains and then one day I looked down and I could see my big pink toenail sticking out :( (Ok it's not that sad of a story, but it is to me)
I was sad but retired them to the top of the closet and for Mothers Day and my birthday got two beautiful new pairs but still missed the originals. Then I remember seeing on a blog somewhere, I think it was Ashley Ann. She put a patch at the toe of her Toms, so I started experimenting.
I used some fantastic Amy Butler fabric, razor blade and a hot glue gun!
This is what I ended up with and it didn't look quite right so I went and grabbed another piece of scrap fabric and perfect...

I am totally in love with them!


Wednesday, July 4, 2012

Re-Paint By Number


I have always thought paint by numbers were neat looking, especially when done with bright fun colors. The only problem is they are usually of little kids fishing or dogs... stuff that doesn't look great hanging in my house. I got to spend the weekend with my super awesome friend, Aubrey. Aubrey has the cutest house on the face of the earth and some stinking awesome paint by numbers, legit ones. There were a few things that she was getting rid of that I brought home with me. Two of them were some paint by number roses that I think her grandmother painted onto crushed velvet. The only problem was that the colors were very very sad.
A while back I saw a project on a blog that I follow, Ashley Ann (Jade says I stalk). She bought an old picture and repainted over it, paint-by-number-esque. Here is a link to that project.
So I took the sad colored roses and tried it myself. 
Here are the originals...
(It is completely impossible to take a picture of something in a frame with a black background without a reflection)
I grabbed some acrylic paint that I already had in some fun, bright colors and just painted over what was already there. Here's what I got...


I painted the frames, too.


I seriously couldn't get a picture without a crazy glare or reflection... I haven't decided where to put these yet, but I absolutely love them! This was seriously my favorite project, I had so much fun painting! I may go crazy and start repainting all the paint-by-numbers I can find. Hint, Hint, if anyone has any they don't want any more.
Thanks Aubrey for these treasures!


Saturday, August 20, 2011

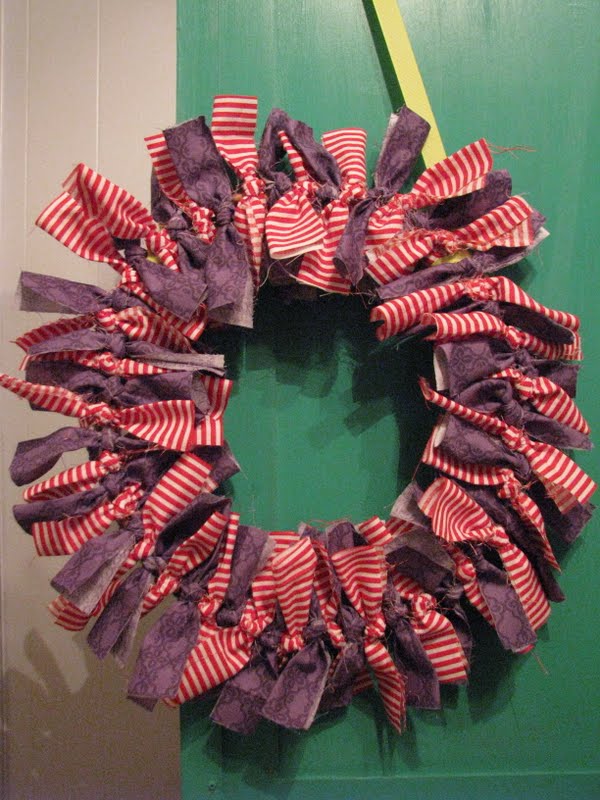
Shag Wreath

My sweet in-laws took my sweet boys to San Antonio for 2 days and one of those days my husband had to go out of town for work. SO... I got to work in my classroom for the entire time! Alone!
I was feeling tired frustrated at the end of one of the days and decided to go raid the teacher section at Dollar Tree (which was awesome) and got a wreath form to decorate for my door. 
I had a sneaking suspicion that making something to decorate my room with would make me feel a lot better. I was totally right. I know the pictures aren't the best but I took these at midnight so there was a slight lack of natural light.

The first thing I did was turn on The Nanny and popped some popcorn.

This is the wreath form I found. They had 2 different sizes.
This is the fabric I choose, I already had a lot of it. I cut it into strips 3 inches wide and 12 inches long.
I folded the strips in half length wise and then tied double knots 
Just keep tying and squish them together until you're done. You can either fluff them up or lay them flat.
To hang it with I cut a ribbon and tied it around the form. So easy. So cute. So many options.

Tuesday, August 16, 2011

Pom pom garland

School started back for me this week and I'm so excited and so tired at the same time. I am going to try to keep up my creativity enough to keep this blog going... we shall see :)

I made a garland out of pom poms and it turned out to be way cuter and way easier than I expected!
I just bought a huge bag of them at Hobby Lobby when they were half off. 
All you do is cut a piece of thread the length that you want and thread a needle, you don't even need to tie a knot at the end of the thread.
 The pom poms stay exactly where you put them as long as you put the needle through the very middle of the ball. 
You can put them tightly close together or spread them out.


I love these! I hung them in my classroom, which I will include pics of later when it's actually finished.
I will for sure be making these for christmas decor, and possibly halloween and valentines!


Thursday, August 4, 2011

Old frame makeover

While I was in Kerrville for my birthday I found this huge frame with a board nailed to the back for $4. 
My plan was to paint it and do chalkboard paint in the middle. Then I realized I already have a chalkboard in my hallway, kitchen and living room.
My mother in law is wanting to redo her kitchen with fun bright decor and had a big blank wall that would be perfect for a chalkboard... 
 The pictures are a little weird but it was so big that it was hard to get it all in one picture and you still be able to see the design. I also changed some setting on my camera while we were on vacation and it made the pictures really wide. I have no idea how to undo it...
I'll post vacation pics when I can hold my eyes open a little better, SO tired!